
iPhone XS and iPhone XS Max are the two popular models of iPhones. When it comes to design, iPhone XS and XS Max vary a lot from the previous versions. It implies that certain functions on iPhone XS and XS Max are also different from older iPhone models. For example, it was always easy to take a screenshot on older iPhone versions. Similarly, it is quite easy to take a screenshot on iPhone XS/XS Max. However, it is a bit different from the older versions as those models have a Home button. The section will help you on how to take a screenshot on iPhone XS/iPhone XS Max in two different ways.
How to Take a Screenshot on iPhone XS/XS Max
There is more than a single way to capture a screenshot on an iPhone XS/ XS Max. Here we shall discuss two different ways by which you can take screenshots on an iPhone XS or XS Max.
1. Take a Screenshot on iPhone XS/ XS Max using the Buttons
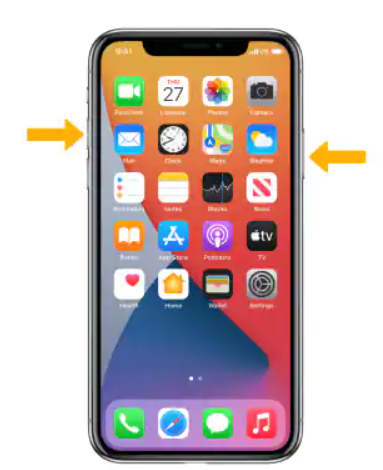
You can use the buttons on your iPhone XS/XS Max to take a screenshot. Initially, make yourself comfortable with the buttons on your iPhone. It has both the Volume buttons on the left side of the iPhone. Also, you can find the Side button on the right side of the iPhone. These steps will help you with taking a screenshot on iPhone XS and XS Max.
1. Launch the app or webpage where you need to snap a screenshot.
2. Press and hold the Volume Up button and the Side Button simultaneously.
3. You can release the buttons after two or three seconds.
4. If the screenshot is taken, and you can see the animation of the screenshot on the screen.
5. If your phone isn’t on silent mode, you will hear a camera shutter sound.
6. A thumbnail of the screenshot appears at the bottom left on the screen.
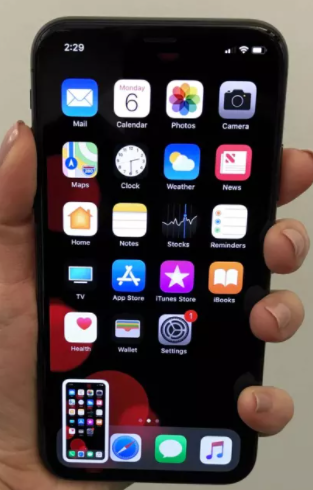
7. Further, the screenshot will get saved on your device by itself.
Related: How to Turn Off iPhone 12 Pro Max [3 Simple Ways]
2. Take Screenshot on iPhone XS Max/XS using AssistiveTouch
AssistiveTouch is one of the mind-blowing features of the iPhone XS and XS Max. You can use this AssistiveTouch button to perform functions on your iPhone. Similarly, you can use this feature to capture a screenshot on your device. The following steps will help you take a screenshot using the AssistiveTouch feature.
Step 1: Enable AssistiveTouch
1. Open the Settings app on your iPhone.
2. Tap on the General option from the menu.
3. Further, tap on the Accessibility option and then on the Touch option.
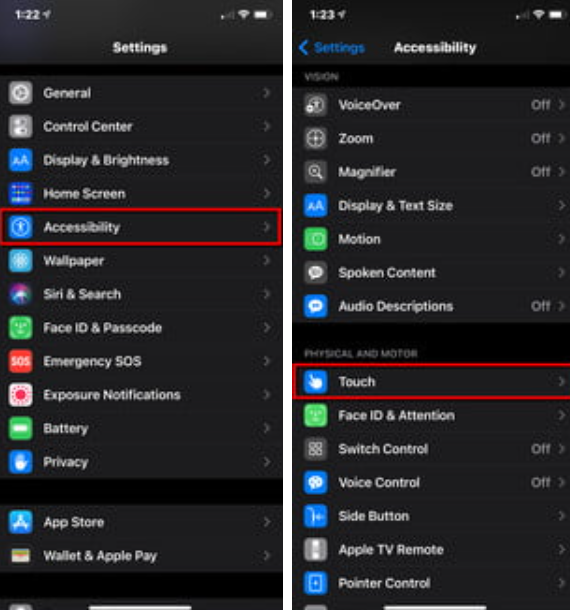
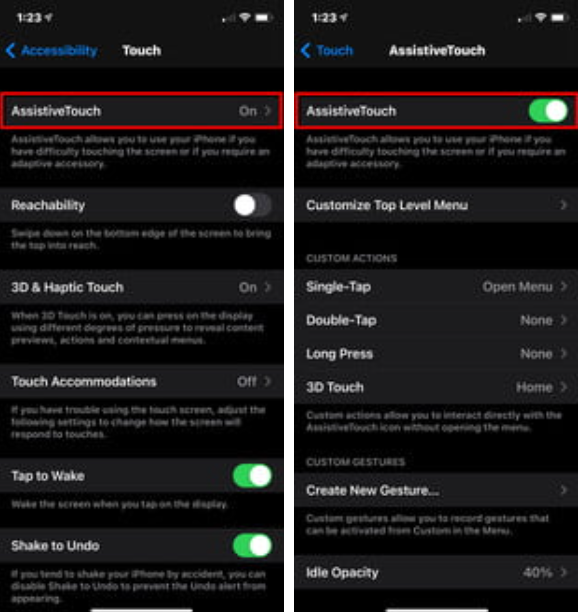
4.Tap on AssistiveTouch and turn it on by pressing the toggle.
Step 2: Customize Top Level Menu
Now, you can see the AssistiveTouch button on your screen. It is a semi-transparent button on your screen. We need to add the Screenshot function to this button so that we can take a screenshot with it.
1. Firstly, tap on the Customize Top Level Menu option.
2. Further, click on the Customize icon.
3. From the list, choose Screenshot.
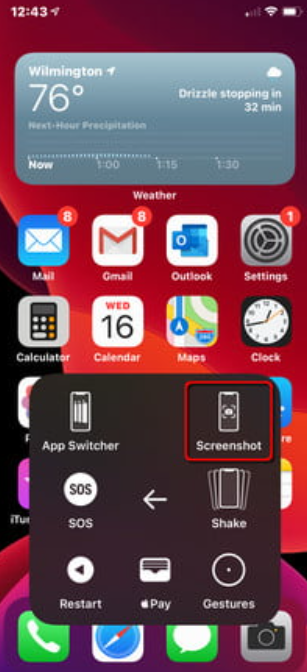
4. Now, you have added the Screenshot function to the AssistiveTouch menu.
5. Tap on any default icon to replace it with a Screenshot icon.
Related: How to Take Screenshot on iPhone 12 Pro Max in 3 Ways
Step 3: Take a Screenshot on iPhone XS Max/XS
Now, you have already set the Screenshot function to the AssistiveTouch button. So, you can now take screenshots using this feature.
1. Launch the webpage or app where you need to capture a screenshot.
2. Click on the Assistive Touch button on your screen.
3. Further, click on the Screenshot icon.
4. The screenshot is taken right away and you can see it on your screen.
You can choose any of the ways to capture screenshots on your iPhone XS or XS Max. The screenshots will be saved on your device automatically. You can access them in the Photos album of your iPhone. Also, you can edit these screenshots and share them on other applications on your iPhone. Hope you find it a lot easier to capture screenshots with this article. You can find more useful articles on our blog.