
Mac by Apple is the best computer to perform lots of multitasking. Just like taking a print from iPhones, Mac users can add printers and get printouts. By adding printers, you can take print of anything like photos, files, documents, and more on the go. However, the procedure of adding a printer is unlike connecting a mouse to Mac. i.e., adding a printer to Mac vary based on the printer model and the type of connection you opt to. As Mac supports all types of printers, users can add printers wirelessly or use a wired connection. In addition, there are different ways in which you can connect a printer to Mac.
How to Add Printer to Mac
You can connect the printer to Mac in different ways. The procedure is different based on the printer you have. We have listed all the possible ways in the below section.
How to Connect Printer to Mac Wireless
If you have a wireless printer that is AirPrint compatible, you can connect it easily to the Mac. Turn on your printer and follow the steps given below.
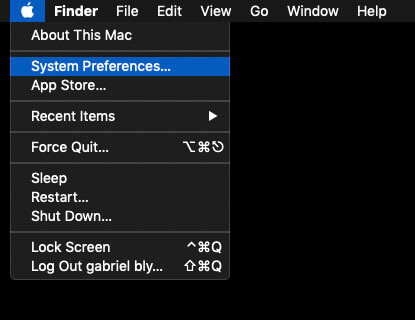
1. Tap the Apple icon on your Mac and choose System Preferences.
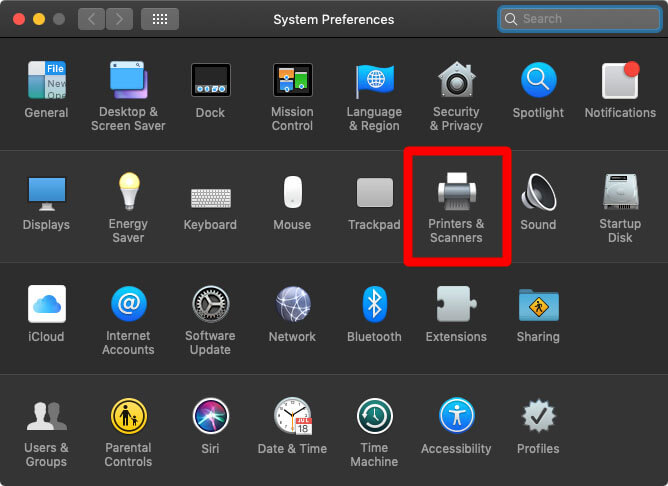
2. Click on Printers and Scanners.
- If you have an old model, choose Print & Scan under hardware.
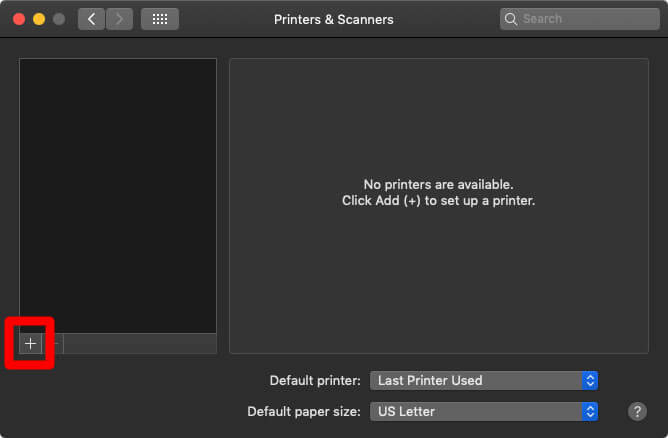
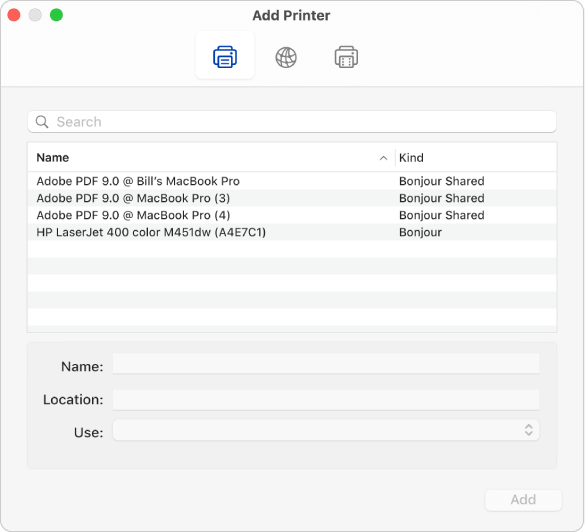
3. Choose the + icon to see the list of printers available.
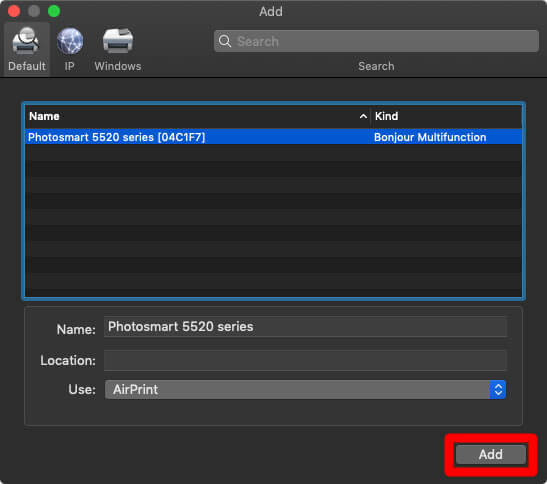
4. Select the Printer you want to add.
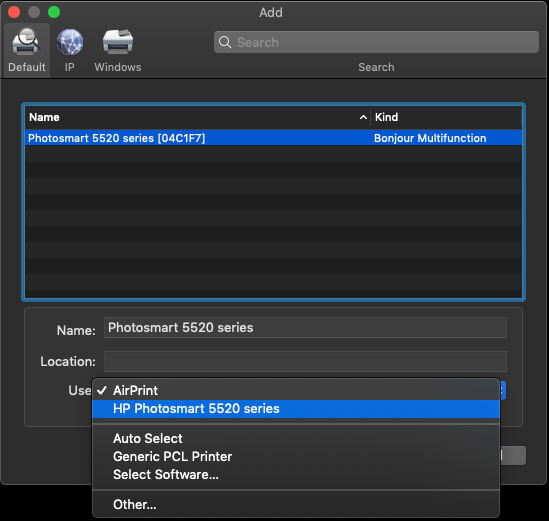
5. If you see AirPrint in the Use field, you can add the printer directly by clicking the Add button.
6. If not, select your printer and click on Add. Then, select Download drivers from Apple servers. The driver will download automatically.
7. Once done, tap Add, and the printer will be added to the list of printers.
How to Connect Printer to Mac Computer Via USB
Whether your printer isn’t wireless or not an AirPrint compatible, you can connect it through the USB cable. Mac will recognize any printer connected over USB automatically and download the necessary software. If that doesn’t take place, you shall proceed to manually add the printer to Mac PC.
1. Plug in the USB printer to Mac.
2. Then, navigate to the Apple icon >> System Preferences >> Printers and Scanners.
3. Tap the + sign to see the list of printers and choose the USB printer.
4. Finally, click Add to add the printer to the list.
Add a Printer to Mac Via IP Address
If you know the IP address of your printer, follow the below-given steps to add the printer to MacBook.
1. Tap the Apple icon and choose System Preferences.
2. Click on Printers & Scanners.
3. Tap the + sign below the list of printers.
4. Now, click on the IP icon, which looks like a blue globe icon.

5. Next, type the IP address of your printer in the Address field.
6. If you want, you can change the name of your printer.
7. In the Use field, select the Printer driver you want to use.
8. Click Add to add the printer to the list.
Add a Bluetooth Printer to Mac
If you have a Bluetooth printer, you can pair it easily to your Mac and start printing. You can add the printer to the list and enable Bluetooth on your computer.
1. On your Mac, tap the Apple icon and click System Preferences.
2. Click Printers & Scanners.
3. Tap the + icon and select the printer from the list and click Add.
4. When you want to print something, you can click on the Bluetooth icon on the Mac and select Bluetooth Preferences and pair your printer.
Add a Printer to Mac via WPS
1. Turn on your Mac and printer.
2. On your printer, click the WiFi button.
3. Now, on the router, press the WPS button.
4. Ensure that the printer has a network connection. Based on the model, you can check the connection on display, by the network, or the printer parameters text.
5. Then, go to System Preferences and add the printer to the printer’s list.
Add a WiFi or Mobile Printer to MacBook
Some printers require you to install a configuration profile so that it can be easily found on the network using AirPrint. Get the profile that is provided or download/copy the profile and follow the steps given below.
1. Double click on the profile to open.
2. On the message box, tap Continue to install the profile.
3. Once the profile is installed, go to System Preferences and add the printer to the printer’s list.
4. To add your printer, go to the Apple menu >> System preferences >> Printers & Scanners.
5. Tap the Add button and click the Default button.
6. Choose the printer from the printers list and click Add.
How to Print from Mac Wirelessly
Mac supports adding the wireless printer only once, and it will auto recognize it whenever you turn on the printer.
1. Select the file or document that you want to print.
2. Click on the File tab and choose the Print option.

3. On the Print Command screen, expand More Settings.

4. Scroll down to choose print Using System Dialogue.
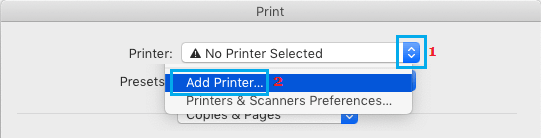
5. Click on the down arrow next to the Printer field and select Add printer option.
6. Finally, select your printer name.
How to Remove an Unused Printer from Mac
If you no longer use a particular printer but added it to the list, you can disconnect it from MacBook at any time.
1. Go to System Preferences >> Printers & Scanners.
2. Choose the printer that you want to remove and tap the – button.
3. Click Delete to confirm to delete the printer.
That’s it. These are the different ways you can use to add a printer to your MacBook. If you have an AirPrint compatible printer, you can add it easily to your Mac. After adding the printer, you can print anything you want. The procedure will work on any type of printer like HP, Samsung, Dymo, Kyocera, and more.
Frequently Asked Questions
You can add a printer to Macbook Pro wirelessly, via Bluetooth, using a USB cable, and almost all the ways discussed in this section. It is based on the type of printer you have.
If you can’t add a printer to Mac, reset the Mac printing system.
You can’t add a printer to Mac when the printer isn’t compatible. In the case of wired printers, the issue may be due to the faulty USB cable.