
AirDrop is the most useful feature you will find on your Apple devices, including the iPhone. With this feature, you can transfer files wirelessly across Apple devices. It saves a lot of time and effort in transferring bigger files, including music and videos, on your devices. Similarly, you can AirDrop files from your iPhone to Mac and the other way around. It is a direct file transfer option that doesn’t involve sending messages, email, or using other services. With this method, you can easily share the photos you took on your iPhone to your Mac and edit them on your Mac. With this, you save a lot of time every single time you AirDrop. Let us look into this same feature in-depth.
How to AirDrop from iPhone to Mac
If you haven’t synced your iPhone to your Mac via iCloud, AirDrop is the best option for you. Also, keep the number of photos shared through AirDrop to a minimum, as it might take some time if you are sharing loads of them. AirDrop from iPhone to Mac involves the following steps.
Turn on AirDrop on iPhone
Firstly, let us start by turning on AirDrop on your iPhone. Follow these simple steps and enable the AirDrop feature.
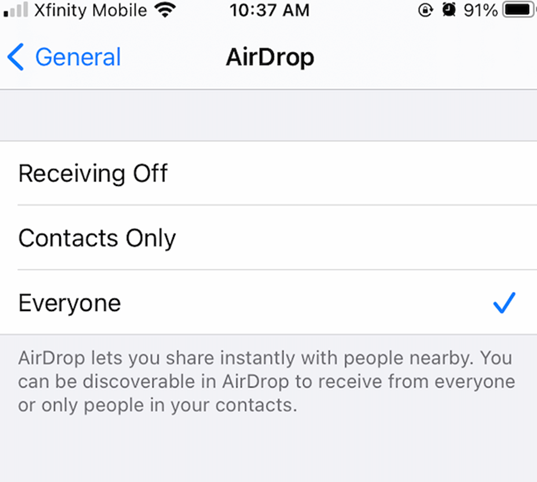
1. On your iPhone, launch the Settings app.
2. Tap General on the menu.
3. Further, tap AirDrop.

4. Now, you can see three different options on your screen. Based on your needs, you can tap on one of those.
- Contacts Only: AirDrop files only to your friends on your Contacts.
- Everyone: AirDrop files to the one near your iPhone.
5. Turn on Wi-Fi and Bluetooth and place your iPhone within 30 feet of your Mac.
Enable AirDrop on Mac
Now, you should proceed to turn on the AirDrop function on your Mac. Follow these simple steps to turn on the AirDrop function.
1 On your Mac, open Finder and choose AirDrop from the sidebar on the left.
2. On the Allow me to be discovered by field, choose the Contacts Only or the Everyone option.
3. Further, make sure that both Wi-Fi and Bluetooth on your Mac are turned on.

Steps to AirDrop from iPhone to Mac
Finally, you can now transfer the files from your iPhone to Mac via AirDrop.
1. On your iPhone, open the file you want to share. In case you have more files to share, select all of them.

2. From the bottom-left corner, tap the Share icon.
3. Further, click on the AirDrop option.
4. From the list, pick your Mac.

5. You can see the text Waiting below the icon. Further, it changes to Sending and finally to Sent.
6. Finally, tap the Done option.
Mac Not Showing Up on AirDrop: Troubleshooting Tips
It is not common but, sometimes your Mac doesn’t show up on AirDrop. The following may be the reason for the same.
1. Mac is Asleep
If your Mac is asleep, then it won’t show up or be visible on AirDrop. So, you need to make your Mac active to use AirDrop. Press on any key on your Mac to wake it.
2. Bluetooth
Ensure that Bluetooth is turned on both of your devices while performing AirDrop. This is because AirDrop employs Bluetooth to locate nearby devices. Also, the devices should be within a distance of 30 feet from each other.
3. Wi-Fi
Check if the iPhone and Mac are connected to the same Wi-Fi. This is because AirDrop uses Wi-Fi to transfer files between them.
Now, you know how to AirDrop files from your iPhone to Mac. There is no limit to the number of files that you can share via AirDrop. However, the time taken for sharing depends on the number of pictures that you AirDrop. Hope this article helps you with the AirDrop files from your iPhone to Mac. Follow our blog for more useful updates and articles.