
Apple has designed the iPad for everyone and multiple purposes. It delivers incredible performance, and you can do any task with ease. The retina display of the iPad is the best to watch a movie. You will experience detail and vivid colors whenever you stream any video using your iPad. If you know how to put movies on an iPad, you will be probably able to watch all your favorite movies and TV shows. Fortunately, there are multiple ways to add movies to your iPad, and they are discussed in brief in the upcoming section.
How To Put Movies on iPad
You will get to know the fast and reliable methods by which you can put movies on your iPad.
Using Apple TV App
Use the Apple TV app on iPad to add movies directly or with no effort.
1. On your iPad, launch the Apple TV app.
2. Hover to search or browse for any movies.

3. Select a movie you want to add to your iPad.
4. Now, click on the Buy or Rent button based on the option available.
5. When prompted, provide your Apple ID and passcode or touch ID.
6. After the purchase, click on the Play button to stream the movie.
7. Go to the Library tab to view the purchases and rentals you have made earlier.
8. Click on any title and select the Download icon to watch it offline.
Using iTunes
The steps given below will let you add movies from the iTunes library to your iPad.
1. Connect your iPad to your PC with the help of a USB cable.
2. Launch iTunes if it doesn’t open up automatically.
3. Hover to tap on your device icon and select Movies.
4. Now, click on Sync Movies and choose the titless you want to put on the iPad.
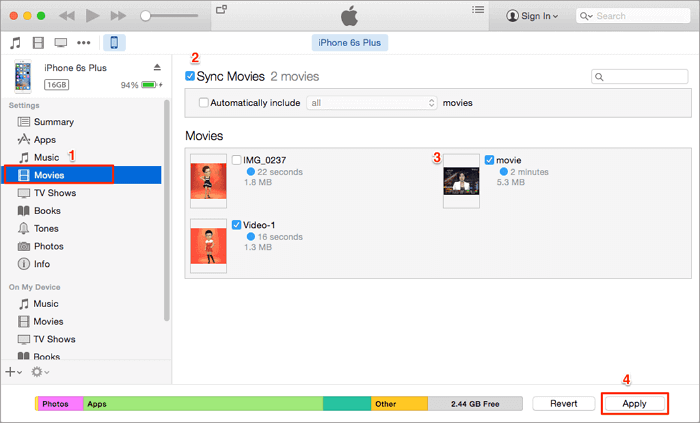
5. Tap on the Apply button to add movies.
Using Finder
Since iTunes is discontinued from macOS Catalina, you shall use the Finder to add movies on iPad.
1. On your PC, launch Finder and connect your iPad to it using the USB cable.
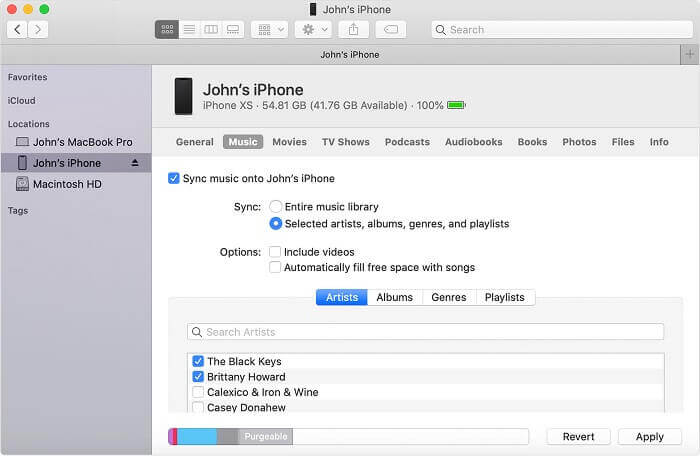
2. Navigate to click on the iPad name and choose Movies.
3. Select the Sync movies onto the (device name) checkbox and choose the file you want to transfer.
4. Click on the Apply button to confirm adding movies to the iPad.
Using iCloud
It is possible to download movies on your iPad with the help of your iCloud Drive.
1. On your iPad, open Settings to click on the profile name. Select iCloud and choose iCloud Drive.
2. Visit iCloud.com on your PC and log in to your account.
3. Select the movie file to upload and wait for the sync process to complete.
4. Now, go to the Files app on your iPad, and you will find the movie file.
Using VLC
It is possible to transfer movies to an iPad with the help of the VLC player.
1. Launch the VLC app on your iPad and click on the VLC icon.
2. Click on the Sharing via WiFi option and note down the IP address.
3. Launch a browser on your computer, and enter the IP address.
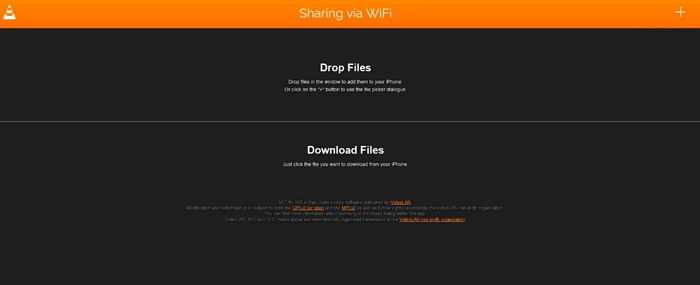
4. Go ahead to drag and drop the movies or select the Plus icon to choose the movies.
5. Once the transfer gets completed, the movies will be available on the VLC app on iPad.
Using iTunes Store
iPad users can make use of iTunes Store to directly buy or rent movies.
1. Launch the iTunes Store app on the iPad.
2. Hover to click on the Movies section.
3. Select the Search option and browse for movies.
4. Choose any movie and tap on the Buy button.
5. Log in to your iTunes account to confirm the action.
6. After making payment, you will find the movie on your iPad. Optionally, go to More >> Purchased >> Movies.
These were the possible ways in which you can add films to your iPad. You could try any methods based on your convenience. For more useful article updates, visit our blog.