
Mac is known for its best security. It makes sure the user’s data are entirely safe and private with iCloud. iCloud is the primary requirement to sync data from or to any Apple device. By using the same iCloud ID, the entire media gets sync across all of the devices. There may be times you would be asked to approve Mac from another device signed in to iCloud. It occurs whenever you have updated the Mac to the latest version. For security reasons, you will be prompted to authenticate your Mac from another device that uses the same iCloud. Apple has included this feature in a way to enhance the data security in addition to providing the device passcode. While you can authenticate macOS from any device, we chose to use iPhone. In no time, you shall check out this section for how to approve Mac from iPhone.
How to Approve Mac from iPhone?
Whether you have purchased a Mac or upgraded it with the latest version, you should approve it on iCloud. Here is all you need to approve macOS from iPhone with iCloud.
1. On your Mac PC, select the Apple menu from the menu bar.
2. Choose the System Preferences option.
3. Select Apple ID and highlight iCloud on the sidebar.
- Those using macOS Mojave or below shall click on iCloud.
4. Scroll down to choose Keychain.
5. You will be prompted to enter the 6 figure or Apple ID verification to approve Mac.
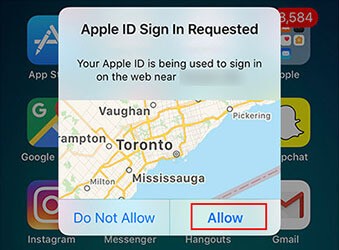
6. Meanwhile, open the iPhone (with the same iCloud as that of Mac), and it will show you that another device uses the same iCloud.
7. If it asks you to allow it or not, click Allow to get the Apple ID verification code.
8. You shall enter the Apple ID verification code on Mac.
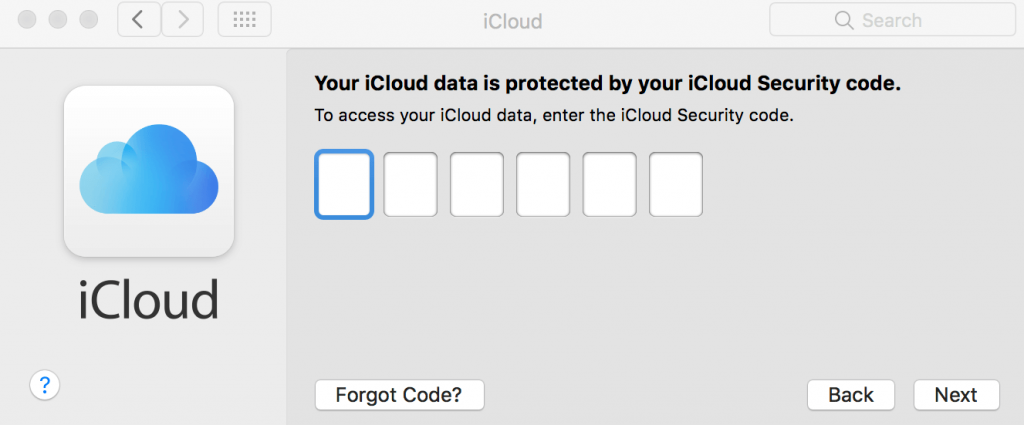
9. If the code entered is correct, then it means that you have successfully approved Mac from iPhone via iCloud.
Also see How to Approve iPhone/iPad [3 Easy Methods]
Now you have learned the steps to approve Mac from iPhone using iCloud. With this, your device and data are secured from unauthorized access.
For more useful tips and tricks, you shall check out our blog.